Proxy là một giải pháp không thể thiếu cho nhiều nhu cầu như ẩn IP, quản lý truy cập mạng, tăng tính bảo mật và hỗ trợ nuôi tài khoản trên các nền tảng mạng xã hội. Trong bài viết này, VPSTTT sẽ hướng dẫn bạn cách tạo proxy trên VPS bằng Squid – một trong những proxy server phổ biến và hiệu quả nhất hiện nay.
Trong thời đại số hóa, nhu cầu sử dụng proxy ngày càng trở nên phổ biến – từ việc bảo mật kết nối, ẩn IP, đến quản lý tài nguyên số, tự động hóa và nuôi tài khoản mạng xã hội. Một trong những cách hiệu quả và linh hoạt nhất để sở hữu proxy riêng là tạo proxy trên VPS.
Vì Sao Nên Tạo Proxy Squid Trên VPS?
- Dễ cài đặt và quản lý.
- Miễn phí, mã nguồn mở
- Hỗ trợ cấu hình linh hoạt: IP, port, whitelist, blacklist
- Hoạt động ổn định, phù hợp với nhiều mô hình cá nhân và doanh nghiệp
Bước 1: Chuẩn Bị VPS
- Trước tiên, bạn cần có một VPS Chạy hệ điều hành Centos 7 cấu hình tối thiểu 1 vCPU và 512 mb Ram và dùng BvSshClient để đăng nhập
Bước 2: Bắt đầu
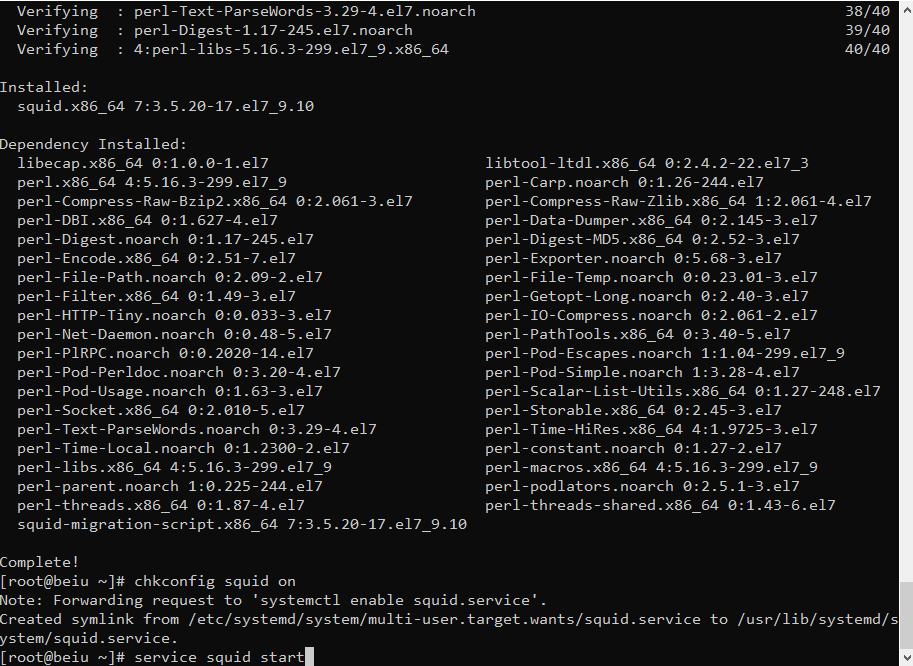
- Sau khi kết nối tới VPS, bạn chạy lệnh cài đặt Squid:
yum install -y squid
- Cấu hình để Squid để tự động chạy mỗi khi Server khởi động lại với lệnh sau:
					chkconfig squid on
service squid start

vi /etc/squid/squid.conf
- Thông tin cấu hình cho Squid sẽ được chứa trong file
/etc/squid/squid.conf.
- Mặc định Squid sẽ chạy trên port 3128, nếu bạn muốn Squid chạy trên port khác thì mở file/etc/squid/squid.conf và tìm dòng sau để thay đổi http_port 3128
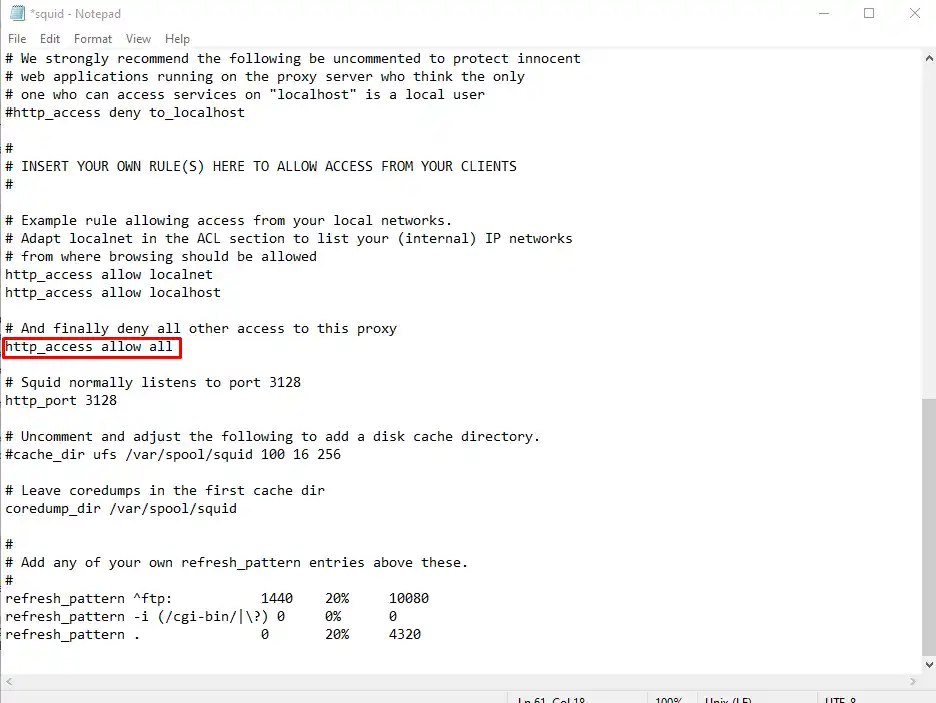
Lưu ý: Để mở quyền truy cập, bạn sửa (có thể làm sau)
Bạn sửa http_access deny all thành http_access allow all

Bước 3: Thêm xác thực người dùng cho Proxy
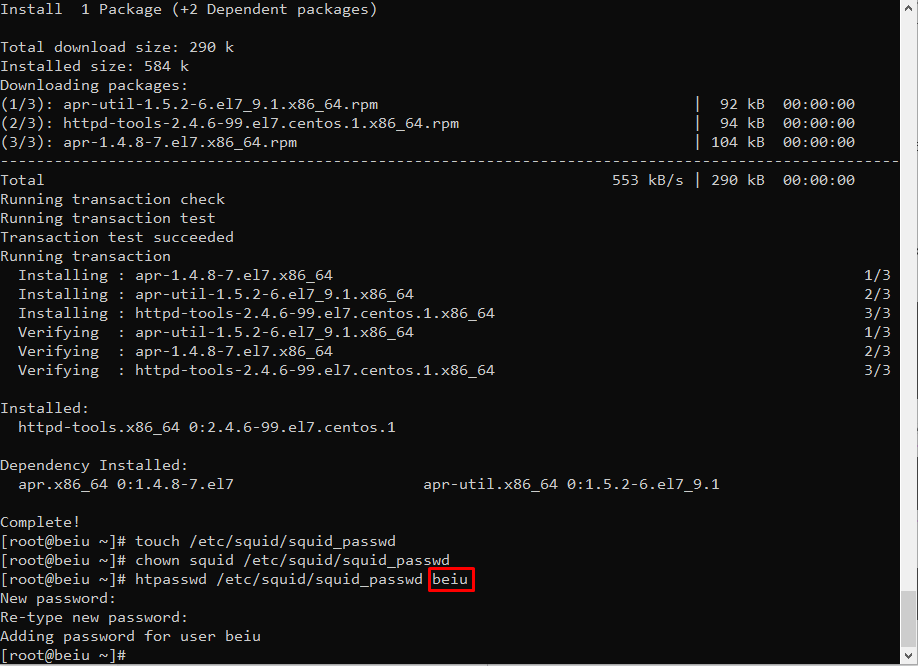
Để tăng tính bảo mật cho Proxy, bạn nên tạo tài khoản người dùng để truy cập proxy của mình. Chạy các lệnh sau:
					yum install -y httpd-tools
touch /etc/squid/squid_passwd
chown squid /etc/squid/squid_passwd
Sau đó, chạy câu lệnh sau để tạo user, hệ thống sẽ yêu cầu bạn nhập mật khẩu:
htpasswd /etc/squid/squid_passwd USER_CỦA BẠN

Với Debian và Ubuntu :
dpkg -L squid | grep ncsa_auth
RHEL/CentOS/Fedora :
rpm -ql squid | grep ncsa_auth
Kết quả báo ( dùng nó để thêm ở bước sau)
/usr/lib64/squid/basic_ncsa_auth
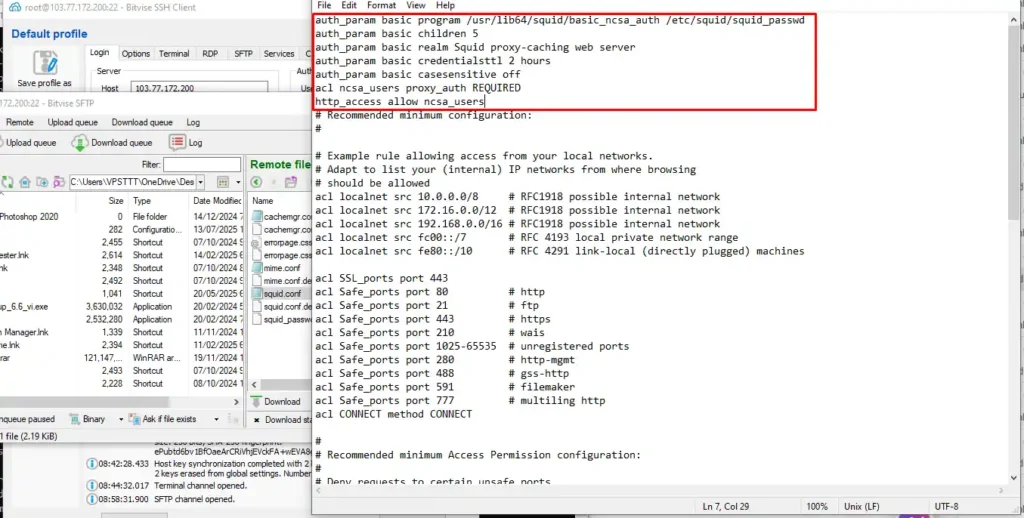
Sau đó vào New SFTP window /etc/squid/squid.conf thêm vào dòng đầu của file với nội dung sau:
					auth_param basic program /usr/lib64/squid/basic_ncsa_auth /etc/squid/squid_passwd
auth_param basic children 5
auth_param basic realm Squid proxy-caching web server
auth_param basic credentialsttl 2 hours
auth_param basic casesensitive off
acl ncsa_users proxy_auth REQUIRED
http_access allow ncsa_users

Ngoài ra, để sử dụng Squid làm Proxy mà không muốn bị phát hiện ra là bạn dùng proxy thì bạn thêm vào cuối file /etc/squid/squid.conf nội dung sau :
					via off
forwarded_for off
request_header_access Allow allow all
request_header_access Authorization allow all
request_header_access WWW-Authenticate allow all
request_header_access Proxy-Authorization allow all
request_header_access Proxy-Authenticate allow all
request_header_access Cache-Control allow all
request_header_access Content-Encoding allow all
request_header_access Content-Length allow all
request_header_access Content-Type allow all
request_header_access Date allow all
request_header_access Expires allow all
request_header_access Host allow all
request_header_access If-Modified-Since allow all
request_header_access Last-Modified allow all
request_header_access Location allow all
request_header_access Pragma allow all
request_header_access Accept allow all
request_header_access Accept-Charset allow all
request_header_access Accept-Encoding allow all
request_header_access Accept-Language allow all
request_header_access Content-Language allow all
request_header_access Mime-Version allow all
request_header_access Retry-After allow all
request_header_access Title allow all
request_header_access Connection allow all
request_header_access Proxy-Connection allow all
request_header_access User-Agent allow all
request_header_access Cookie allow all
request_header_access All deny all
Sau đó khởi động lại Squid để các cấu hình trên có hiệu lực :
service squid restart
Bước 4: Nhiều Proxy / 1 VPS
Nếu bạn có nhiều IP gán trên VPS và muốn sử dụng mỗi IP cho một proxy riêng, hãy làm theo các bước sau:
Cấu hình trong file /etc/squid/squid.conf
Định cấu hình IP bổ sung trong Squid
Xóa dòng mặc định: http_port 3128
Và thay thế bằng cấu trúc như sau:
http_port IP:PORT name=proxy1
acl proxy1 myip IP
tcp_outgoing_address IP proxy1
Trong đó:
proxy1là tên định danh cho proxy (bạn có thể đặt tên khác)
IPlà địa chỉ IP cụ thể của VPS
PORTlà cổng bạn muốn mở
Ví dụ cụ thể:
					http_port 51.199.10.15:3128 name=proxy1
acl proxy1 myip 51.199.10.15
tcp_outgoing_address 51.199.10.15 proxy1
Thêm nhiều Proxy với nhiều IP khác nhau, chỉ cần sao chép phần và chỉnh sửa nó với các chi tiết IP khác của bạn. Ở đây tôi đã thêm hai IP nữa vào tệp squid.conf
http_port 51.199.10.15:3128 name=proxy1
acl proxy1 myip 51.199.10.15
tcp_outgoing_address 51.199.10.15 proxy1
http_port 51.199.10.16:3128 name=proxy2
acl proxy2 myip 51.199.10.16
tcp_outgoing_address 51.199.10.16 proxy2
http_port 51.199.10.17:3128 name=proxy3
acl proxy3 myip 51.199.10.17
tcp_outgoing_address 51.199.10.17 proxy3
Lưu và khởi động lại Squid:
service squid restart
Nếu bạn không muốn sử dụng Proxy server bằng VPS của mình, ta có thẻ remove xóa Squid ra khỏi VPS bằng lệnh sau:
yum remove squid -y
Link check proxy IPv4 : https://proxy6.net/en/checker
CHÚ Ý: Bạn có thể xem video rõ hơn ở đường link dưới đây ⇓
KẾT LUẬN
Qua bài viết này, VPSTTT hy vọng đã giúp bạn nắm rõ cách tạo proxy riêng trên VPS bằng Squid, từ cài đặt cơ bản cho đến cấu hình nâng cao nhiều proxy trên một máy chủ. mạng.
Việc sử dụng proxy riêng trên VPS mang lại nhiều lợi ích:
- Chủ động kiểm soát IP, Port, bảo mật
- Tối ưu tốc độ truy cập, hỗ trợ nuôi tài khoản, SEO, automation
- Chi phí thấp, dễ quản lý, triển khai nhanh chóng


